Total Pageviews

Search This Blog

Translate

Tuesday, 23 September 2025

Thompson's Baked Beans

I recently acquired a beanpot and I am anxious to make some baked beans.

My father had a beanpot and I don't know where it would of got to.

Beans you purchase at the store that are in tin cans are ok at best.

Making your own is a labour of love.

Ingredients 

2 cups Thompson's White Pea Beans
5 cups cold water
1 medium onion sliced
1/4 Tbsp salt
2 tsp cider vinegar
1 Tbsp brown Sugar
1/2 tsp yellow mustard
1/4 cup Crosby's Fancy Molasses 
1/2 cup ketchup
Pinch black pepper 
1/4 pound sliced bacon

Stuff you will need 

Beanpot or Dutch oven
Cooking pot with lid
Cutting board 
Sharp knife 
Mixing bowl
Colander 
Potato Masher

Directions 

Sort and rinse the beans.

Soak beans in cold water, overnight.

Drain.

Add beans to your cooking pot and add 5 cups cold water.  Heat to boiling.  Cover and simmer the beans for 30 minutes.

Drain.

Add the onions to the beanpot.  Add everything but the bacon.  Stir gently to combine.

Add enough water to cover the beans.

Add the bacon.

Put the cover on the beanpot.

Oven to 250 F.  Bake for 7 hours.

When beans are tender, remove 1 cup of beans and mash them.

Add the mashed beans back into the beanpot and gently stir to combine.

Cover and continue to bake.

Add water as necessary to keep the beans covered, while the beans are baking.

One hour before serving, remove the lid so that the beans can darken.

Salt to taste.

PRO TIPS

To get really dark beans, add an extra 1/2 cup of molasses and do not add ketchup.

Keep the same amount of ketchup, but add more molasses and don't add the brown sugar.

To get that je nes sai quois, vice topping off with water as the beans are baking, substitute apple juice.

Add liquid smoke.  Not too much as a little goes a long way.

Substitute diced salt ham for the bacon.

To reduce the gassy effects of the beans, change the soaking water a few times.  About every 3 hours.  This will also diminish some of the taste.  Not a terrible amount though.

What pairs well with baked beans

Baked beans pair well with smoky, savory, and tangy flavors, making them a classic companion for barbecue and comfort food dishes. 

For a barbecue

Barbecue meats: Pulled pork, brisket, ribs, and barbecue chicken are all classic pairings.

Grilled meats: Simple grilled pork chops, burgers, or hot dogs are excellent choices.

Sausages: Grilled or smoked sausages, such as brats or links, complement the beans' hearty flavor. 

For a classic comfort meal

Cornbread: The sweet and crumbly texture of cornbread is a perfect match for savory baked beans.

Mashed potatoes: For a classic, satisfying meal, serve your beans alongside a scoop of creamy mashed potatoes.

Mac and cheese: A side of rich, gooey mac and cheese creates the ultimate comfort food plate.

Coleslaw: The crunchy, tangy flavor of coleslaw provides a refreshing contrast to the sweetness of the beans. 

As a main dish

Baked beans on toast: This simple dish is a popular and classic British meal.

Jacket potato with beans: A baked potato with a scoop of baked beans is a filling and inexpensive meal.

Add meat: You can easily transform baked beans into a main dish by stirring in ground beef or leftover ham and bacon.

Use as a topping: Use baked beans to top hot dogs for "Boston dogs" or on a grilled cheese sandwich. 

To complement the flavor

Bacon: For a smoky flavor, mix strips of cooked bacon into your baked beans.

Cheese: Grate some sharp cheddar or other cheese over the top of the beans just before serving.

Brown bread: For a traditional New England meal, serve your beans with steamed Boston brown bread. 

‐‐----‐------------------------------------------------------------

Lastly, and I have lived in all 10 Provinces and two the Territories, only in Cape Breton do they serve Fish Cakes & Beans.

Monday, 22 September 2025

Webster's Baked Beans

Webster's Baked Beans

Ingredients 

1 lb.  Webster Farms Dried Beans  454 g
2 tsp.  dried mustard  10 ml
1/2 cup  brown sugar  125 ml
2/3 cup  molasses  165 ml
1 tsp.  salt  5 ml
1/4 tsp.  pepper  1 ml
1/6 lb.  salt pork or bacon  75 g
1 tsp.  vinegar  5 ml
1  medium onion  1

Directions

Soak beans overnight in plenty of water to cover

or

Place beans in large pot with 6 cups of water, boil 5 minutes covered, remove from heat and let stand 1 hour. Drain and discard water then rinse.

Place beans in large pot with 6 cups of water, after boiling 5 minutes simmer until beans are tender, approximately 1/2 hour. A sure test is to remove a bean from the pot, blow on it, if the skin cracks, they are ready. Beans simmered too long will become mushy, not long enough will remain hard. Drain, rinse and place in slow cooker.

Combine ingredients, except onion, with 1 cup warm water, stir well, pour over beans, stir gently, add enough water to cover, add quartered onion to top. Cook on high for 4-6 hours covered. These may be done in the oven, covered, at 300 degrees F./150 degrees C. for 4-6 hours. Add water during cooking if necessary. Avoid excessive stirring.

Makes approximately 6 cups.

Canning Baked Beans

Baked beans can be canned safely, but only with a pressure canner, never a water bath canner, since beans are a low-acid food and risk botulism if not processed correctly. Here’s how you can safely do it:


🔹 General Safety Notes

  • Use tested canning recipes (USDA, Ball, Bernardin, or National Center for Home Food Preservation).
  • Do not add flour, cornstarch, or dairy to the beans before canning — thickeners cause uneven heating.
  • If your baked beans recipe uses bacon, ham, or salt pork, you can include small amounts, but fatty meat may shorten storage life.

🔹 Method for Pressure Canning Baked Beans

  1. Prepare Your Beans

    • Start with fully cooked baked beans (seasoned as you like, but no thickeners).
    • Keep them hot while you prepare jars.
  2. Prepare Jars

    • Use clean pint or quart jars.
    • Ladle hot beans into hot jars, leaving 1 inch headspace.
    • Remove air bubbles and adjust headspace if needed.
    • Wipe rims, then apply lids and rings finger-tight.
  3. Pressure Canning

    • Place jars in your pressure canner with the recommended amount of water.
    • Process at 10 pounds pressure (weighted gauge) or 11 pounds (dial gauge).
    • Time:
      • Pints → 65 minutes
      • Quarts → 75 minutes

    (Adjust pressure for altitude: if above 1,000 ft, increase to 15 lbs for weighted gauge, or follow USDA altitude chart for dial gauge.)

  4. Cooling

    • Turn off heat and let pressure return to zero naturally.
    • Wait 10 minutes before removing lid.
    • Cool jars on a towel, undisturbed, for 12–24 hours.
  5. Storage

    • Check seals. Store sealed jars in a cool, dark place for up to 12–18 months.
    • If a jar doesn’t seal, refrigerate and eat within a week.

✅ End result: Shelf-stable baked beans, ready to eat once opened.


You mentioned that adding bacon or pork fat may shorten the canning life span. Can you expand on that?

Yes — that’s a really smart detail to dig into.

When we talk about adding bacon, ham, or salt pork into home-canned baked beans, the issue isn’t safety (as long as you’re pressure canning properly), it’s quality and storage life. Here’s why:


🔹 Why Meat & Fat Affect Shelf Life

  1. Fat Rancidity

    • Fats, especially pork fat, can go rancid over time, even in sealed jars.
    • Rancid fat makes the beans taste off (like cardboard or sour) long before the beans themselves spoil.
  2. Separation Issues

    • Fat can rise to the top of the jar during canning, sometimes interfering with the jar seal.
    • That can shorten storage stability, or in worst cases, lead to seal failure.
  3. Texture Over Time

    • Meat chunks soften considerably during the long canning process (65–75 min). After 6–12 months, they can turn mushy.
    • Beans without meat usually keep their quality longer.
  4. Storage Recommendation

    • Beans canned with pork or bacon are best eaten within 6–12 months.
    • Meatless baked beans often stay high-quality for 12–18 months (sometimes longer if kept very cool and dark).

🔹 Safe Approach

  • You can include small amounts of bacon or salt pork (many tested USDA/Ball recipes do).
  • Trim as much fat as possible before adding it.
  • Store jars in a cool (below 70°F/21°C), dark place — warmth accelerates fat breakdown.
  • For longest shelf life, some people prefer to can meatless baked beans, and then add freshly cooked bacon or ham when serving.


Would adding cut up hot dogs to your beans effect the shelf life?

Yes — adding hot dogs to your beans would affect shelf life, and more than bacon or salt pork in some ways. Here’s why:


🔹 What Happens if You Can Hot Dogs in Beans

  1. High Fat Content

    • Hot dogs are fatty and contain emulsifiers. Over time, the fat can separate and go rancid.
    • This reduces flavor quality and makes jars less stable for long-term storage.
  2. Texture Breakdown

    • The long, high heat of pressure canning (65–75 minutes) causes hot dogs to turn soft, spongy, or mushy.
    • After months, the texture gets even worse.
  3. Shelf Life Impact

    • Safe shelf life remains 12–18 months (since pressure canning kills botulism spores).
    • But quality shelf life (good flavor/texture) would likely be closer to 3–6 months if hot dogs are included.
  4. Best Practice

    • For canning: Stick to beans + sauce.
    • For eating: Add sliced hot dogs when you open the jar and reheat. That way you keep good flavor and texture.

👉 So: Safe to can (if you pressure can properly), but not recommended for quality reasons.


Sunday, 21 September 2025

Beanpot Navy Beans


Adding a little tang really balances out the sweetness of molasses and apple juice. Here’s the savory-tangy variation:


🫘 Savory Apple-Cider Beanpot Baked Beans

Ingredients

  • 1 lb (about 2 cups) dried navy beans (or Great Northern beans)
  • ½ lb salt pork or thick-cut bacon, cut into chunks
  • 1 medium onion, peeled and left whole (or quartered if you prefer)
  • ⅓ cup molasses
  • 2 tbsp brown sugar (reduce to 1 tbsp if you want less sweetness)
  • 1 tbsp Dijon mustard (or spicy brown mustard)
  • 1 tsp salt
  • ½ tsp black pepper
  • 2½ cups hot water
  • 1–1½ cups apple juice (for topping up during cooking)
  • 2 tbsp apple cider vinegar (added near the end)

Instructions

  1. Soak the beans

    • Rinse beans, then soak overnight in plenty of water. Drain before cooking.
  2. Parboil the beans

    • Put beans in a pot, cover with fresh water, and bring to a boil.
    • Simmer about 10 minutes, then drain.
  3. Prepare the beanpot

    • Place the onion in the bottom of the beanpot.
    • Add the salt pork/bacon on top.
  4. Mix the seasoning

    • In a bowl, combine molasses, brown sugar, mustard, salt, and pepper with the hot water. Stir until blended.
  5. Assemble

    • Pour the parboiled beans into the beanpot.
    • Pour the molasses mixture over the beans, adding enough to just cover.
  6. Slow bake

    • Cover and bake at 250°F (120°C) for about 6–8 hours.
    • Check every couple of hours. If beans look dry, add apple juice (instead of plain water).
  7. Add tang at the finish

    • In the last 30 minutes of cooking, stir in apple cider vinegar. This keeps the tang bright and prevents it from dulling during long cooking.
  8. Serve

    • Beans should be tender, smoky-sweet, and tangy with a balanced depth of flavor.

👉 This variation has that sweet-smoky base but with a refreshing zip at the end. Perfect with roasted meats or just some hearty bread.


Wet Wet Sauce


This is an alternative to Hot Chili Sauce

Wet Wet Sauce 

Ingredients 

3 tablespoon green onions white part thinly sliced
1½ teaspoon minced garlic
1 teaspoon minced ginger
2 tablespoon gochugaru/Korean chili flakes
1 teaspoon white sesame seeds
½ cup vegetable oil
1 tablespoon soy sauce
1 tablespoon oyster sauce
1 tablespoon rice vinegar
1 teaspoon toasted sesame oil

Directions

Place green onions, garlic, ginger, gochugaru, and sesame seeds into a large heatproof pot.
Heat oil over medium heat in a sauce pan until it's hot but not smoking.

Carefully pour the hot oil over the green onions, garlic, ginger, and chili flakes.

The oil will begin to bubble. Stir everything and allow it to cool for a bit.

Stir in soy sauce, oyster sauce, and rice vinegar.

Enjoy immediately or transfer the sauce into an airtight jar and store it in the fridge to use later.

Saturday, 20 September 2025

Knockoff Oven Baked KFC Popcorn Chicken


This would be a much healthier version of KFC's Popcorn Chicken. 

Ingredients 

1 lb boneless chicken thighs, cut into bite sized pieces
1 tsp garlic powder
1 tsp paprika 
1 tsp baking powder
1/2 tsp onion powder 
1/2 tsp cayenne pepper 
1/2 tsp white pepper 
1/2 tsp black pepper 
1/2 tsp mixed herbs
1 1/2 tsp salt
1/2 cup cornstarch 
Cooking spray

Stuff you will need 

Cutting board 
Sharp knife 
Mixing bowl
Cookie sheet with wire rack

Directions 

Cut up the chicken into bite sized pieces. 

Spray the chicken with the cooking spray.

Mix all the ingredients together (except cornstarch) and add the chicken.  Toss to evenly coat.

In a different mixing bowl, add cornstarch and the coated chicken.  Toss to coat.

Transfer the chicken to the wire rack and spray the chicken with the cooking oil.

Bake at 400 F for 15 to 18 minutes.

Serve while hot.

Tuscan Chicken Cacciatore

chicken cacciatore

Top Tips To Make Chicken Cacciatore

Any chicken part will do

You can also use boneless chicken thighs, chicken breasts, skinless chicken breasts, and skinless chicken thighs for this recipe.

Low and Slow

This is a low and slow process to keep the chicken moist.

Keep the strong flavor

Keep the leaves on the celery because it has a strong flavor that will add another element to your dish.

Stick with wine or may use alternatives

The alcohol will cook out, so only the flavors of the wine will stay. Use chicken broth or water instead if you don’t want to use wine.

cacciatore recipe

Chicken Cacciatore

Equipment

  • 1 Large casserole dish
  • 1 Kitchen mallet
  • 1 Tongs

Ingredients

  • pcs Chicken drumsticks
  • 5 pcs Chicken wings
  • 5 pcs Chicken thighs
  • 1 Bottle of passataor homemade tomato sauce
  • 1 Extra Virgin Olive Oil(EVOO)
  • 1 Fresh rosemary
  • 1 Celery stickChopped
  • ½ OnionChopped
  • 2 CarrotsChopped into small pieces
  • 1 Bunch of parsleyChopped finely
  • 1 Glass of red wine
  • 2 Garlic cloves
  • 1 Salt & pepper

Instructions

  • We're making this chicken cacciatore recipe traditional, without the slow cooker or crock pot. Start with a large casserole dish, add four tablespoons of extra virgin olive oil, and turn on the heat to medium-low.
  • Add in all the chicken pieces, braising them on all sides until they start to turn golden brown.
  • While they are browning, use a kitchen mallet to smash the garlic (skin on) and add it to the pan with the chicken.
  • Add the lid to the pan and cook for a few minutes. Remove the lid, flip the chicken then cover it again and cook for 10 more minutes.
  • Now, the meat is cooked on both sides and moist. Add the chopped carrots, onion, and celery to the pot for this chicken cacciatore recipe.
  • Move the pieces of chicken around so the vegetables don’t just stay on top and everything cooks through well.
  • Now cover and cook for about 10 minutes until the vegetables are softer.
  • Next, move the chicken around once more before adding fresh rosemary, and then pour the wine on top.
  • Again, cover and cook for another 10 minutes. Then, uncover the chicken and flip the pieces one more time before cooking this chicken cacciatore recipe without a lid until the wine evaporates.
  • Add the homemade tomato sauce (or store-bought passata) and mix it through as best you can.
  • Be generous with the salt and freshly ground black pepper. Sprinkle a little bit of parsley on top and stir.
  • Slow cook everything for 10 minutes with a lid to help create a super flavorful chicken cacciatore recipe, then remove the rosemary and garlic.
  • Cook the chicken cacciatore uncovered for the last 10 minutes. Once finished, add the rest of the parsley on top.
https://www.facebook.com/share/v/17N6D6wcXV/

One Pan Sweet and Tangy Barbecue Sausage Rice


One Pan Sweet and Tangy Barbecue Sausage Rice Recipe
Ingredients:
• 1 pound smoked sausage (such as kielbasa or andouille), sliced
• 1 cup long-grain rice
• 1 cup barbecue sauce (your choice of flavor)
• 2 cups chicken broth
• 1 medium onion, diced
• 1 bell pepper (any color), diced
• 2 cloves garlic, minced
• 1 teaspoon paprika
• 1/2 teaspoon black pepper
• 1/2 teaspoon salt
• 1 cup frozen corn (optional)
• 2 green onions, sliced (for garnish)

Instructions:

1. Sauté Sausage: In a large skillet or pan, heat a little oil over medium heat. Add the sliced sausage and cook until browned, about 5-7 minutes. Remove the sausage from the pan and set aside.

2. Cook Vegetables: In the same pan, add the diced onion and bell pepper. Sauté for about 3-4 minutes until the vegetables are softened. Add minced garlic and cook for an additional 30 seconds until fragrant.

3. Add Rice and Season: Stir in the rice, paprika, black pepper, and salt. Mix well to combine with the vegetables.

4. Combine Ingredients: Pour in the barbecue sauce and chicken broth. Stir to combine, then return the cooked sausage to the pan. If using, add the frozen corn at this stage.

5. Simmer: Bring the mixture to a boil, then reduce the heat to low. Cover the pan and let it simmer for about 20 minutes, or until the rice is cooked and has absorbed the liquid.

6. Fluff and Serve: Remove from heat and let it sit for an additional 5 minutes with the lid on. Fluff the rice with a fork and garnish with sliced green onions before serving.

Homemade Kebabs


I have seen these before, but didn't realize just how easy they are to make.

Ingredients 

1 pound lean ground beef
1 onion chopped
1 red pepper chopped
2 jalapeño pepper chopped and seeded
1/4 cup cilantro 
1/2 Tbsp garlic 
1/2 Tbsp ginger
1/2 tsp salt
1/2 tsp pepper
1/2 tsp paprika 
1/2 tsp cumin
1/2 tsp chili flakes 

Garlic Yogurt 

1/2 cup Greek yogurt 
1/2 lemon juiced
1 tsp garlic powder 
Salt and pepper to taste

Stuff you will need 

Mixing bowl 
Frying pan

Directions 

Mix the hamburger and spices.  

Shape into kebabs and fry.

Once browned, add some cherry tomatoes and fry till the tomatoes are hot.

Serve on a bed of rice.

Garnish the kebabs with the garlic yogurt. 

Serves 2.

Homemade McChicken Sandwich

I do like the taste of McDonald's stuff, but then soon afterwards... I feel poorly.

This recipe the chicken is oven baked and should get rid of that "blah" feeling.

Ingredients 

Chicken patty

2 chicken breasts
1/2 tsp onion powder
1/2 tsp garlic powder
1/2 tsp salt

Breadcrumbs 

1/2 cup cornflakes or panko
1 Tbsp Parmesan cheese 
1/2 tsp paprika 
1/2 tsp salt
1/2 tsp pepper
1/2 tsp onion powder
1/2 tsp garlic powder 
1/2 tsp cooking oil to spray on patty

Sauce

1 Tbsp Mayonnaise 
1/2 tsp mustard
1/4 tsp onion powder

Bun

2 burger buns, toasted
Lettuce, shredded 

Bake time

450 F for 10 minutes 

Stuff you will need 

Blender or food processor 
Oven
Toaster or pan
Cookie sheet lined with parchment paper 
Spatula 

Directions 

Put your chicken breasts and spices into the blender and blend till it is a paste. 

Put some oil on your hands and form two patties.

Cover the patties with the bread crumbs.

Spray some oil on each patty.

Bake 450 F for 10 minutes

Toast your hamburger buns and sauce both top and bottom of the bun.

Start with burger bun bottom, chicken patty, lettuce, burger bun top (with sauce).

Serve while hot.

No "blah" feeling afterwards. 

Friday, 19 September 2025

Classic Marinated Cucumber, Tomato, and Onion Salad


Would You Eat This Classic Marinated Cucumber, Tomato, and Onion Salad

Ingredients:

2 large cucumbers, thinly sliced
3 medium tomatoes, cut into wedges or thick slices
1 medium red onion, thinly sliced
1/4 cup white vinegar (or apple cider vinegar)
3 tbsp olive oil
1 tbsp granulated sugar (optional, for a touch of sweetness)
1 tsp salt
1/2 tsp black pepper
1 tsp dried oregano (or Italian seasoning)
1/4 cup fresh parsley, chopped (optional, for garnish)

Instructions:

1. Prepare the Vegetables:

In a large bowl, combine the sliced cucumbers, tomatoes, and onions.

2. Make the Marinade:

In a small bowl, whisk together the vinegar, olive oil, sugar, salt, black pepper, and oregano. Adjust seasoning to taste.

3. Toss the Salad:

Pour the marinade over the vegetables. Toss well to ensure everything is evenly coated.

4. Marinate:

Cover the bowl and refrigerate for at least 1 hour (or up to overnight) to let the flavors meld.

5. Garnish and Serve:

Before serving, toss the salad again and garnish with fresh parsley if desired.

This Classic Marinated Cucumber, Tomato, and Onion Salad is crisp, refreshing, and perfect as a side dish for any meal. It's a simple yet flavorful salad that gets better the longer it marinates.

Thursday, 18 September 2025

Cajun Shrimp and Sausage Pasta


Cajun Shrimp and Sausage Pasta is a delightful dish that showcases the rich flavors of Southern cuisine. The combination of shrimp and sausage is a match made in culinary heaven. The addition of Cajun seasoning, a staple of Creole cooking, adds a kick of heat and depth of flavor that complements the creaminess of the sauce. The dish is then served over pasta, typically fettuccine, which acts as a perfect base to absorb the bold, savory flavors.

At its core, Cajun shrimp and sausage pasta combines fresh, seasoned shrimp, hearty sausage (often Andouille or smoked sausage), and a rich sauce made from crushed tomatoes, chicken broth, and heavy cream. The dish is seasoned with Cajun spices, creating a harmonious balance of heat, smokiness, and a touch of sweetness.

Whether you’re craving a spicy meal to warm up a cool evening or looking for a dish that will wow your guests, this Cajun-inspired pasta offers a comforting yet exciting culinary experience.

Ingredients You’ll Need

Before you dive into the cooking process, it’s important to gather the right ingredients. Here’s what you’ll need to create the perfect Cajun Shrimp and Sausage Pasta:

Main Ingredients:

  • 1 lb large shrimp: Peeled and deveined, these shrimp will soak up the Cajun seasoning and become perfectly tender when cooked.
  • 1 tsp Cajun seasoning: This spice blend is the backbone of the dish, providing the heat and depth of flavor that makes Cajun cooking so distinctive.
  • ½ tsp dried oregano: Oregano adds a fragrant, earthy note that balances the spice of the Cajun seasoning.
  • Kosher salt and freshly cracked black pepper: Essential for seasoning, these staples enhance the flavors of the other ingredients.
  • 2 tbsp olive oil: Olive oil is your go-to fat for cooking, helping to sauté the ingredients to perfection.
  • 6 oz sausage: Andouille or smoked sausage works best here, but feel free to use a milder sausage if you prefer less heat.
  • 10 oz fettuccine pasta: Fettuccine is ideal because its wide noodles perfectly catch the sauce, making every bite as flavorful as the last.
  • ½ yellow onion: Thinly sliced, the onion adds sweetness and texture to the dish.
  • 1 red bell pepper: Thinly sliced, this vibrant vegetable brings color and a mild sweetness that balances the heat.
  • 4 cloves garlic: Garlic adds that rich, aromatic flavor that every great dish needs.
  • ½ cup crushed tomatoes: These will form the base of the sauce, contributing to the depth of flavor and creamy texture.
  • 1 cup chicken broth: Using low-sodium chicken broth ensures you can control the salt level while enhancing the sauce’s flavor.
  • 1 cup heavy cream: This creates a luscious, velvety texture that brings all the elements together.
  • ⅔ cup grated Parmesan: Parmesan cheese melts beautifully into the sauce, adding richness and a nutty flavor.
  • 1 tbsp parsley: Chopped parsley adds freshness and a pop of color as a garnish.

IngredientQuantity
Large shrimp, peeled & deveined1 lb
Cajun seasoning1 tsp + 4 tsp
Dried oregano½ tsp
Olive oil2 tbsp + extra
Andouille or smoked sausage6 oz
Fettuccine pasta10 oz
Yellow onion½, thinly sliced
Red bell pepper1, thinly sliced
Garlic2-3 cloves, chopped
Crushed tomatoes½ cup
Chicken broth (low-sodium)1 cup
Heavy cream1 cup
Grated Parmesan⅔ cup
Fresh parsley (for garnish)1 tbsp, chopped

How to Make Cajun Shrimp and Sausage Pasta

Now that you’ve gathered all the ingredients, it’s time to cook! Follow these steps to make the perfect Cajun Shrimp and Sausage Pasta.

Step-by-Step Instructions:

  1. Prepare the Shrimp:
    • Start by tossing the shrimp in a bowl with salt, pepper, Cajun seasoning, and dried oregano. Make sure each shrimp is evenly coated with the seasoning mix. This will ensure that every bite has the perfect balance of flavor.
  2. Cook the Shrimp:
    • Heat 2 tablespoons of olive oil in a large skillet over medium-high heat. Once the oil is hot, add the shrimp to the pan. Cook for about 2 minutes on one side, flip them, and cook for another 1–2 minutes until the shrimp are pink and opaque. Remove the shrimp from the skillet and set aside on a plate.
  3. Brown the Sausage:
    • In the same skillet, add a little more olive oil if needed and then add the sliced sausage. Brown the sausage for about 4–5 minutes, stirring occasionally. Once browned, remove the sausage from the skillet and set it aside with the shrimp.
  4. Cook the Pasta:
    • Bring a large pot of salted water to a boil and cook the fettuccine pasta according to the package instructions until it’s al dente. Drain the pasta and set it aside, reserving a little bit of pasta water to help adjust the sauce later if necessary.
  5. Sauté the Vegetables:
    • Reduce the heat to medium in the same skillet and add more olive oil if necessary. Add the sliced onion and bell pepper to the pan, along with a pinch of salt, Cajun seasoning, and brown sugar. Sauté for about 4–5 minutes, stirring occasionally until the vegetables are softened and fragrant.
  6. Add Garlic and Tomatoes:
    • Add the chopped garlic to the pan and cook for about 30 seconds until fragrant. Then, add the crushed tomatoes, chicken broth, and heavy cream to the skillet. Bring the mixture to a simmer, stirring occasionally, and allow the sauce to cook for a few minutes to thicken slightly.
  7. Combine Pasta and Sauce:
    • Once the sauce is simmering, stir in the grated Parmesan cheese, allowing it to melt and thicken the sauce further. Add the cooked pasta and sausage to the skillet, stirring to coat everything evenly in the sauce. Let everything heat through for 2–3 minutes.
  8. Add the Shrimp:
    • Finally, add the cooked shrimp to the skillet. Toss everything together, allowing the shrimp to warm up in the sauce. Taste and adjust the seasoning with salt and pepper if needed.
  9. Serve:
    • Once everything is well combined, serve the pasta in bowls, garnishing with freshly chopped parsley for a burst of color and freshness.

Cooking Tips for the Perfect Pasta

To make sure your Cajun Shrimp and Sausage Pasta turns out perfectly every time, here are some helpful tips to keep in mind:

  1. Adjust the Spice Level: The Cajun seasoning brings heat to this dish, but you can adjust it to your liking. For a milder dish, reduce the amount of Cajun seasoning or use a milder Creole blend. Alternatively, if you want more heat, add a pinch of cayenne pepper.
  2. Use Fresh Garlic and Vegetables: Fresh garlic and vegetables make a huge difference in the final flavor. The garlic should be fragrant but not burned, and the vegetables should be tender but still retain some texture.
  3. Simmer the Sauce: Allow the sauce to simmer long enough for the flavors to meld. This helps to enhance the richness and depth of the sauce.
  4. Use High-Quality Parmesan: Freshly grated Parmesan will melt more smoothly into the sauce, creating a rich, creamy texture. Avoid pre-grated Parmesan, as it can have additives that affect the flavor.

Thursday, 11 September 2025

Sheldon Cooper Spaghetti with Cut Up Hot Dogs

Yes! On The Big Bang Theory, Sheldon Cooper often mentioned (and ate) his very particular comfort food: spaghetti with cut-up hot dogs. It’s simple, very much in line with his childlike food preferences, and has become a little iconic among fans.
Here’s a recipe inspired by what Sheldon eats on the show:


🍝 Sheldon’s Spaghetti with Cut-Up Hot Dogs

Ingredients (serves 2–3):

  • 8 oz (225 g) spaghetti (or your preferred pasta)
  • 4–6 hot dogs (beef or your choice)
  • 2 cups tomato-based pasta sauce (Sheldon would probably prefer something plain and consistent, like jarred marinara)
  • 1 tbsp olive oil or butter
  • Grated Parmesan (optional, but not typically “Sheldon-approved”)

Instructions:

  1. Cook the pasta: Bring a pot of salted water to a boil and cook spaghetti according to package directions until al dente. Drain, but reserve about ½ cup of the pasta water.

  2. Prepare the hot dogs: Slice hot dogs into ½-inch pieces (Sheldon’s are usually bite-sized “coins”).

  3. Cook hot dogs: In a skillet, heat the olive oil or butter over medium heat. Add the hot dog pieces and sauté until lightly browned.

  4. Add sauce: Pour in the tomato sauce and stir. Let simmer 5–7 minutes, adding a splash of pasta water if it gets too thick.

  5. Combine: Toss the drained spaghetti with the hot dog–tomato sauce mixture until coated.

  6. Serve: Plate it up just as Sheldon likes—plain, no fancy garnishes. Parmesan on the side if you’re not bound by his quirks.


👨‍🍳 Optional “Sheldon Accuracy” Notes:

  • He’s picky about routines, so the sauce should taste the same every time (a store-bought brand would suit him).
  • He usually avoids “green bits” (so no basil or herbs).
  • Some fans even make it with just plain spaghetti, sliced hot dogs, and ketchup—because Sheldon likes simple, predictable flavors.


Thursday, 4 September 2025

Pasta ca muddica

Ingredients

  • 300 grams Spaghetti
  • 1-3 Loaf stale bread2-3 day old
  • 1 clove Garlic
  • 3 tbsp Pecorino Romano
  • Fresh parsleySmall handful and chopped
  • 1 tsp Chilli flakes
  • 3 tbsp Extra virgin olive oilEVOO

Equipment

  • Blender
  • Large pot
  • Medium fry pan
  • Tongs
  • Mug
  • Garlic crusher
  • Colander
  • Tablespoon
  • Teaspoon

Instructions

  • Pasta ca muddica needs stale bread – chop yours up into chunks then add it to a blender until it forms breadcrumbs.
  • Before starting on your breadcrumb mixture, boil 5L water in a large pot and once it comes to a boil, add a tablespoon of rock salt.
  • Now, place the pan onto your stove at a medium heat and add 3 tablespoons of EVOO before adding a crushed garlic clove.
  • Cook the garlic for no more than 30 seconds then add the breadcrumbs, stirring them with a wooden spoon and letting them toast until they become nice and crunchy.
  • At the point where the bread is almost completely crisp, add the chilli (optional) before combining the parsley.
  • Keep stirring the mixture allowing the bread to become really crunchy and turn golden brown – this is the key to pasta with breadcrumbs so take your time and get it as crispy as you can.
  • Once you are happy with the texture, remove the pan from the stove and empty the mixture into a bowl, leaving it to the side.
  • Now it’s time to make your spaghetti! Cook for the amount of time noted on your packet instructions.
  • When the pasta is almost ready, collect a mug full of pasta water and leave this for later.
  • Strain your pasta, then put the pan (you used earlier – don’t wash it!) on the stove at a low heat and add 3 tablespoons of extra virgin olive oil to it.
  • Mix the pasta into the pan then pour half a mug of pasta water over the top and mix well using a set of tongs.
  • Add a sprinkle of parsley, then stir again until the water is absorbed and switch of the pan.
  • At this point, add 3 tablespoons Pecorino Romano cheese and toss the pan well.
  • E ora si mangia, Vincenzo’s Plate….Enjoy!

https://www.facebook.com/share/v/1JFUGuJwjF/

Tuesday, 2 September 2025

Soffritto

Soffritto is an Italian cooking base made by gently sautéing finely chopped vegetables—traditionally onion, carrot, and celery—in olive oil (or sometimes butter).

It’s similar to the French mirepoix or the Spanish sofrito, but the Italian soffritto is usually cooked longer and at a lower heat until the vegetables soften and become aromatic, without browning too much.

👉 Purpose:
It’s the foundation of many Italian soups, sauces, braises, risottos, and stews, providing depth and a subtle sweetness that builds flavor in the dish.

👉 Ratio (traditional):

  • 2 parts onion
  • 1 part carrot
  • 1 part celery

Sometimes garlic, pancetta, or herbs are added depending on the recipe.


Here’s Chef Vincenzo’s beloved soffritto recipe—his signature flavor base used in his famed Tomato Basil Pasta Sauce:


Chef Vincenzo’s Soffritto (from Vincenzo’s Plate)

Ingredients

  • 1 carrot
  • 100 g onion
  • 1 stalk of celery (including leaves)
  • Approx. 100 ml extra virgin olive oil (EVOO)

Instructions

  1. Blend the base
    Add the carrot, onion, celery, and EVOO to a hand blender. Blend until the mixture becomes creamy and smooth—this is Vincenzo’s soffritto.

  2. Cook gently
    Heat 3–4 tablespoons of EVOO in a pot over very low heat. Add the soffritto blend, stirring to evenly coat the base of the pot. Cover and let it simmer for about 15–20 minutes, stirring occasionally and ensuring it doesn’t burn.

  3. Add tomato and season
    Once the soffritto starts to deepen in color, stir in your blended passata or chopped peeled tomatoes. Add approximately 2.2 teaspoons (10 g) of rock salt and black pepper. Then cover and simmer slowly for 1–1.5 hours, stirring occasionally.

  4. Uncover and reduce
    After the initial simmer, remove the lid and continue cooking (simmering) for another 30–45 minutes to thicken the sauce.

  5. Finish with fresh basil
    Turn off the heat. Tear 75–100 g (about 2.6–3.5 oz) of fresh basil leaves by hand, then stir them into the hot sauce to release their aromatic flavor. Avoid chopping with a knife to preserve their aroma.


Overview—Vincenzo’s Method vs. Classic Soffritto

  • Chef Vincenzo's soffritto: A creamy, blended base of carrot, onion, celery, and EVOO, intended to dissolve seamlessly into the tomato sauce for a silky texture.

  • Traditional soffritto (Italian classic): Finely chopped carrot, celery, and onion—sautéed (not blended) in olive oil until softened (often not browned), typically following a 2:1:1 ratio (onion:carrot:celery).

Vincenzo’s version elevates the standard soffritto by blending it into a smooth, aromatic base—perfect for a sauce that’s both rich and velvety.


with different dishes! Buon appetito!

Monday, 1 September 2025

One Pan Cajun Sausage and Rice for two


My father was always a believer in cooking for an Army.

But sometimes you don't have an Army to feed.  Its just the two of you.

Ingredients 

1 red bell pepper chopped
1 smoked sausage, chopped
1 tsp Cajun spice
1 cup minute rice
1 cup water

Stuff you will need 

Wide Pan with lid
Stiring spoon
Cutting board 
Sharp knife 🔪 

Directions

Cut up your bell pepper 🌶  and sausage.

Put that in your pan and cook over medium heat till the sausage is browned.

Add the remainder of the ingredients and bring the water to a boil.  Cover and let sit for 5 minutes.

Fluff up the rice and serve right away.

Sausage Rolls


This is another dish that brings me back to my years in the Navy.

What Are Sausage Rolls?
  • Sausage Rolls are savory pastry snacks that consist of pork sausage meat wrapped in puff pastry.
  • The meat is formed into logs then sealed in the pastry with egg wash. They are popular in Commonwealth nations and are considered to-go foods.
  • Although Sausage Rolls are known especially in the UK, they actually originated in 19th-century France. However, the English made this snack popular after filling the pastry with ground pork.


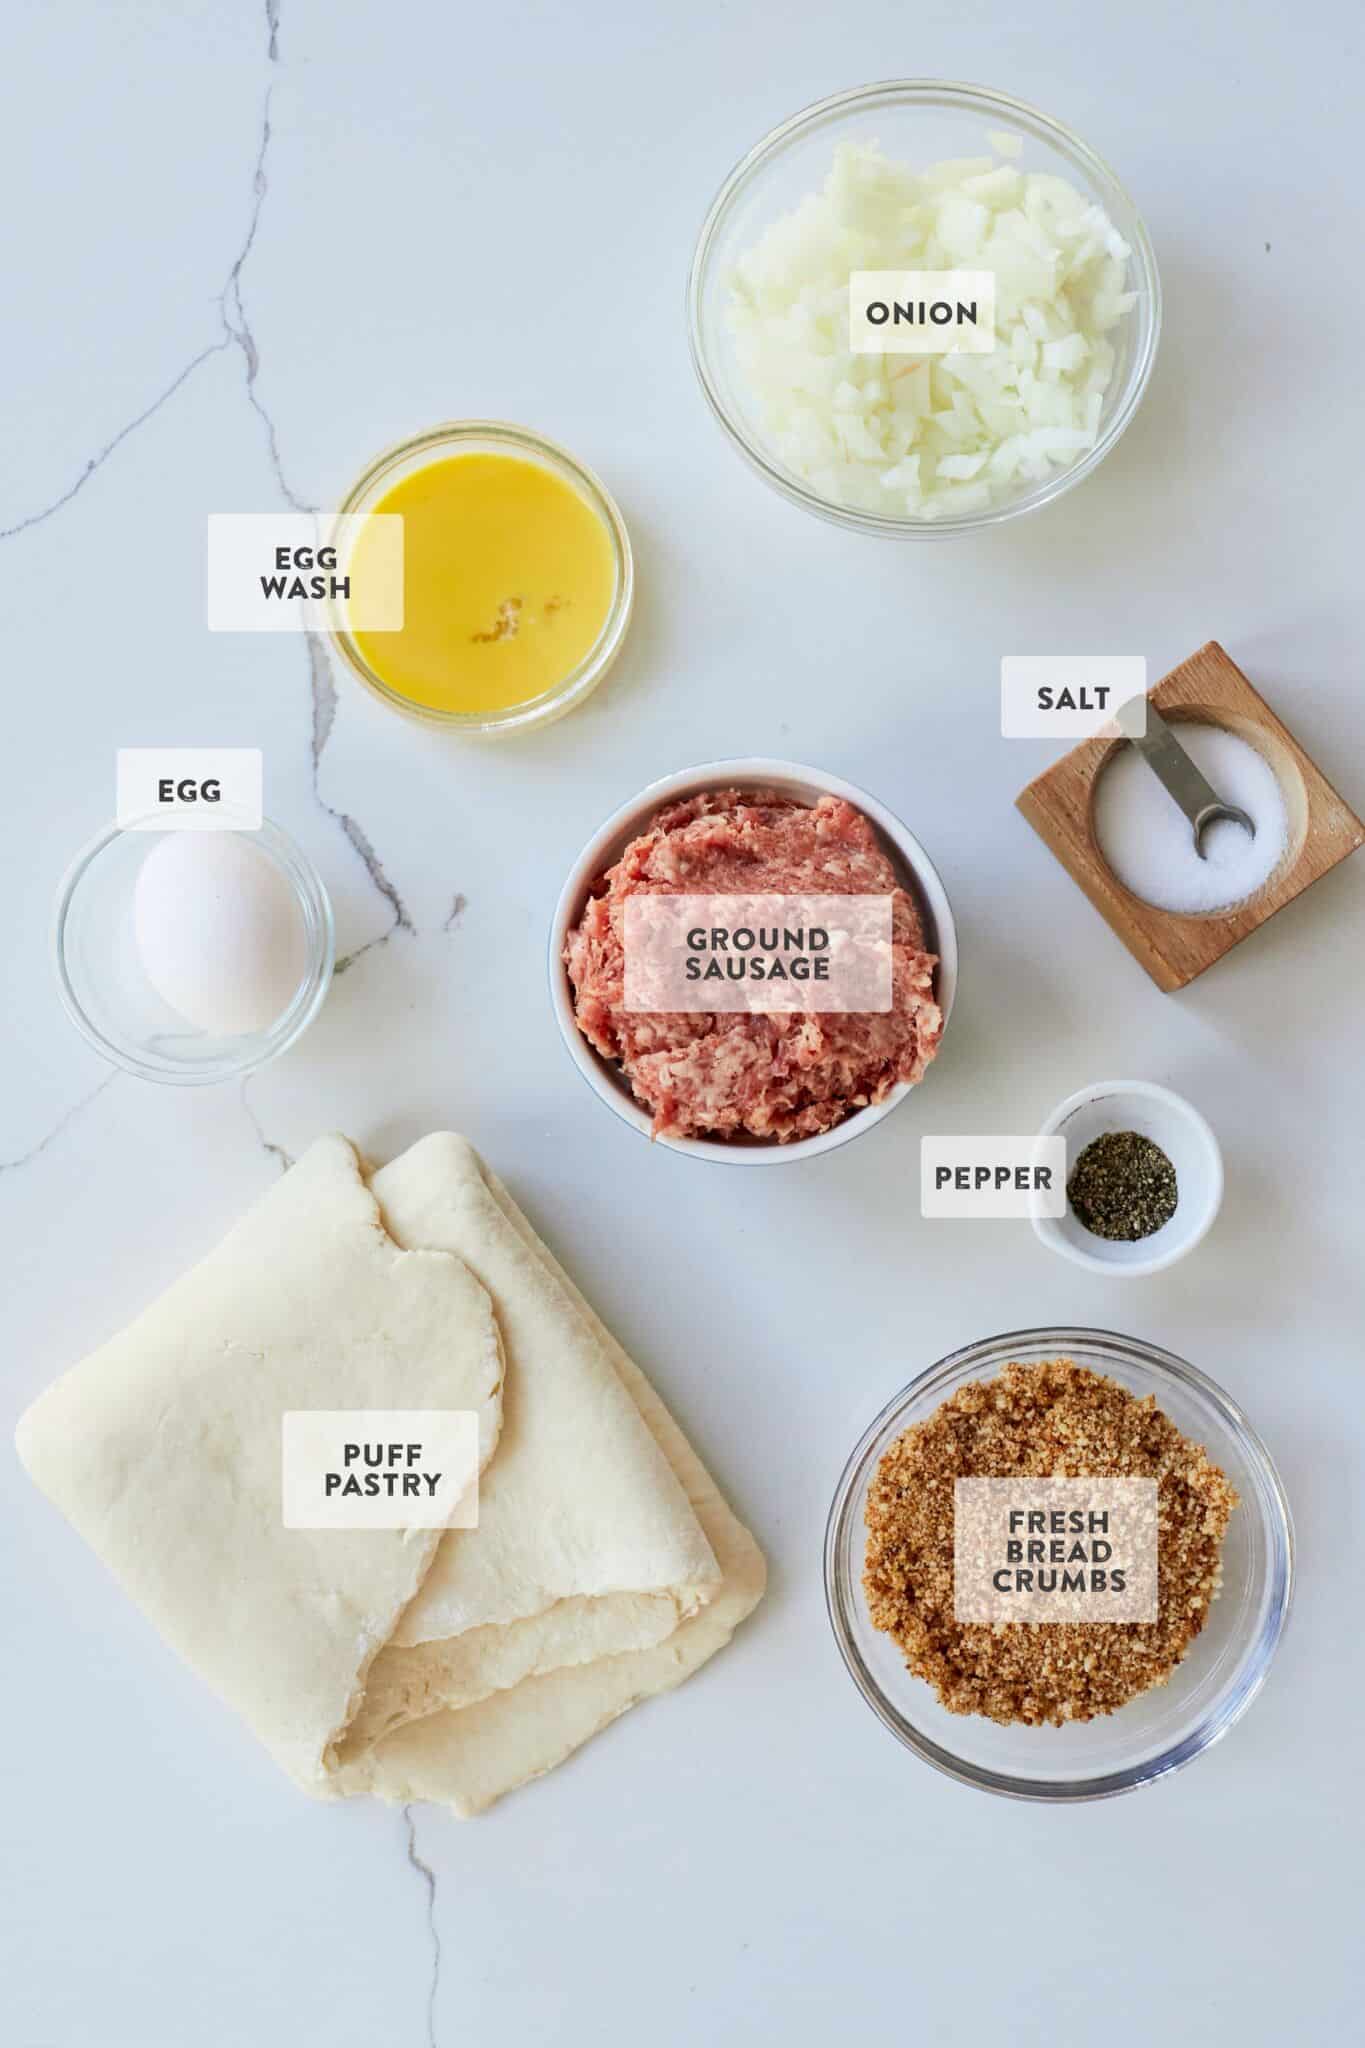
Homemade Irish Sausage Rolls Ingredients

Homemade Sausage Rolls 


How To Make Homemade Sausage Rolls:

Prep

  1. Preheat the oven to 375°F (190°C) and line a baking sheet with parchment paper.

Make the roll dough

  1. Mix the filling: In a medium bowl, mix together the sausage, egg, onion, breadcrumbs, salt and pepper. Set aside.
  2. Rol out the puff pastry dough: On a lightly floured surface, roll out the puff pastry into roughly a 12 x 14-inch (30 x 35 cm) rectangle.

Assemble the Irish sausage rolls

  1. Cut the puff pastry sheet with a sharp knife in half lengthwise so that you have two 6 x 14-inch (15 x 35 cm) strips of dough.
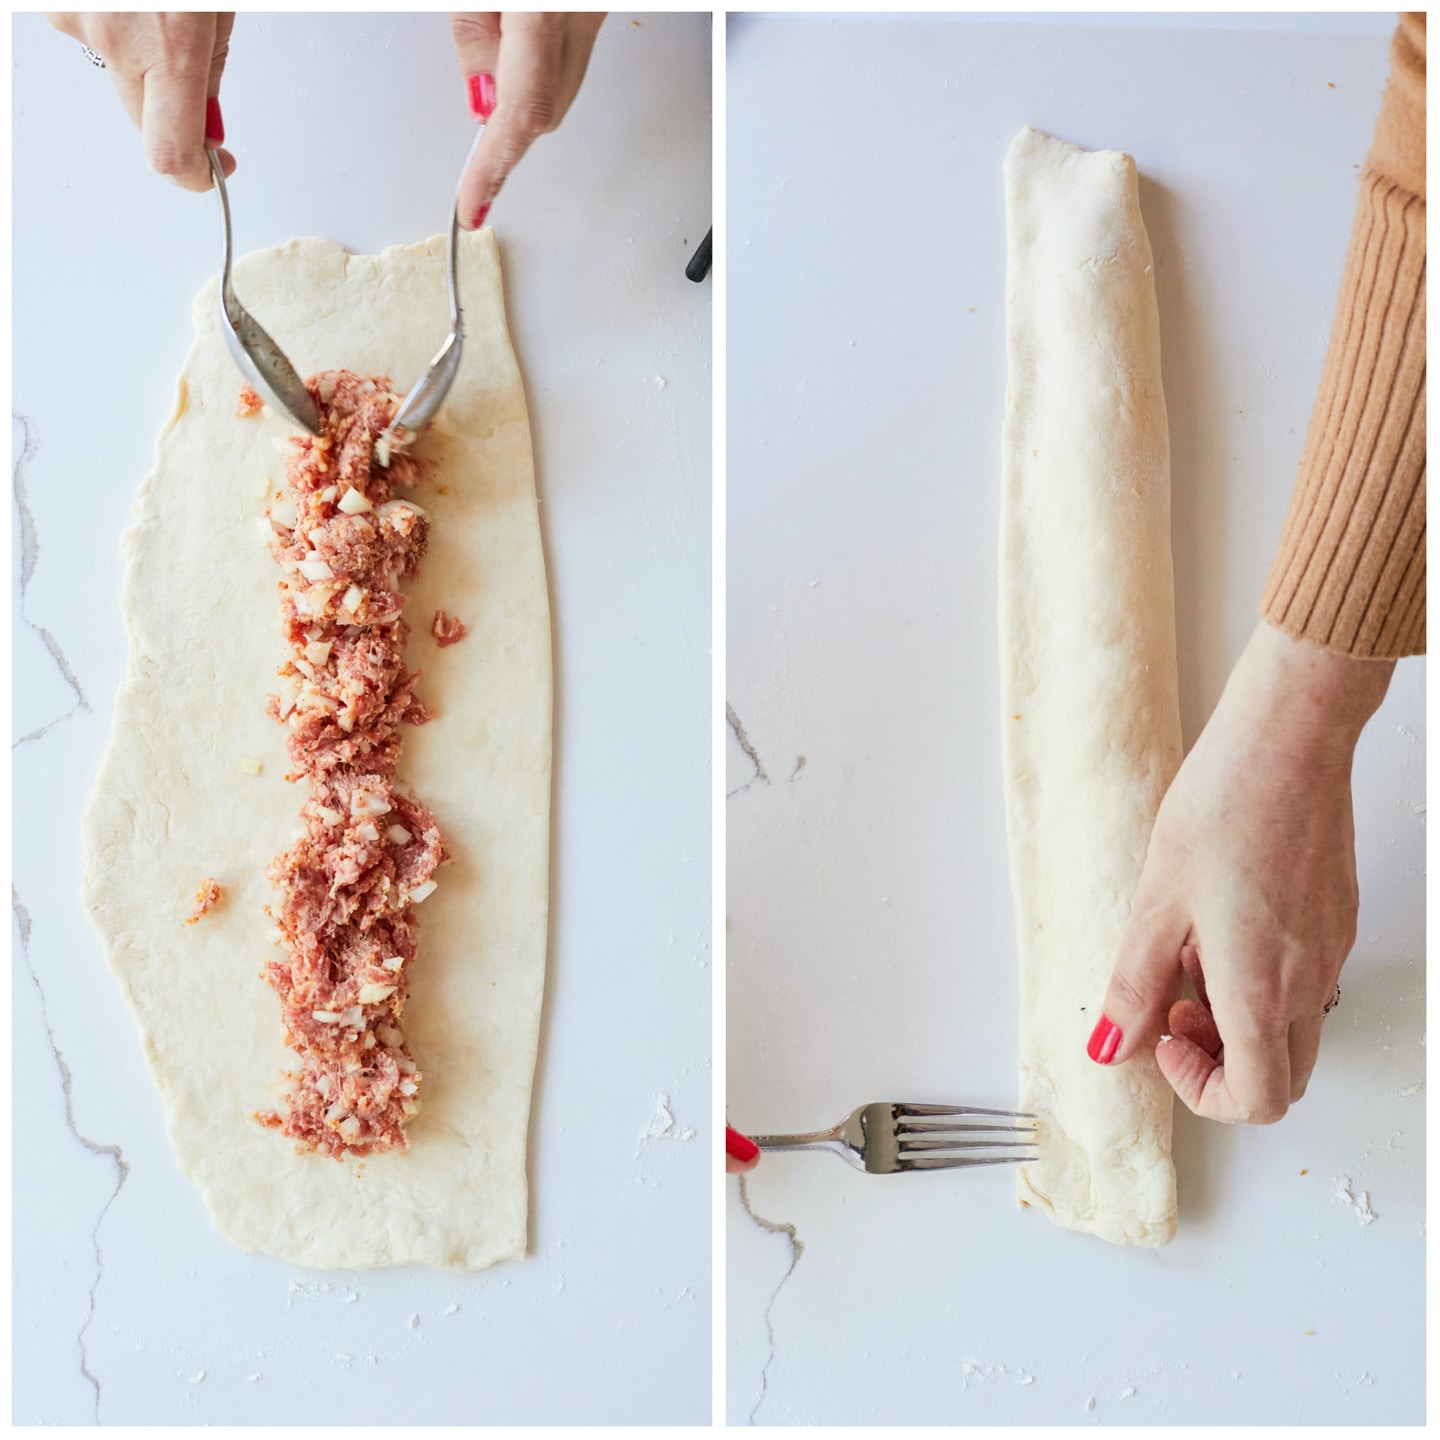
  2. Divide the sausage mixture in half. For each piece of dough, form half of the filling into a sausage log that runs the length of the rectangles. Brush the edges of the pastry with egg wash.

Homemade Irish Sausage Rolls How to Make Sausage Rolls fill and seal

  1. Wrap the dough over the filling and shape into a log. Trim the pastry a little to tidy up the edge and press with a fork to seal. With the fork piece so holes in the top of the pastry.
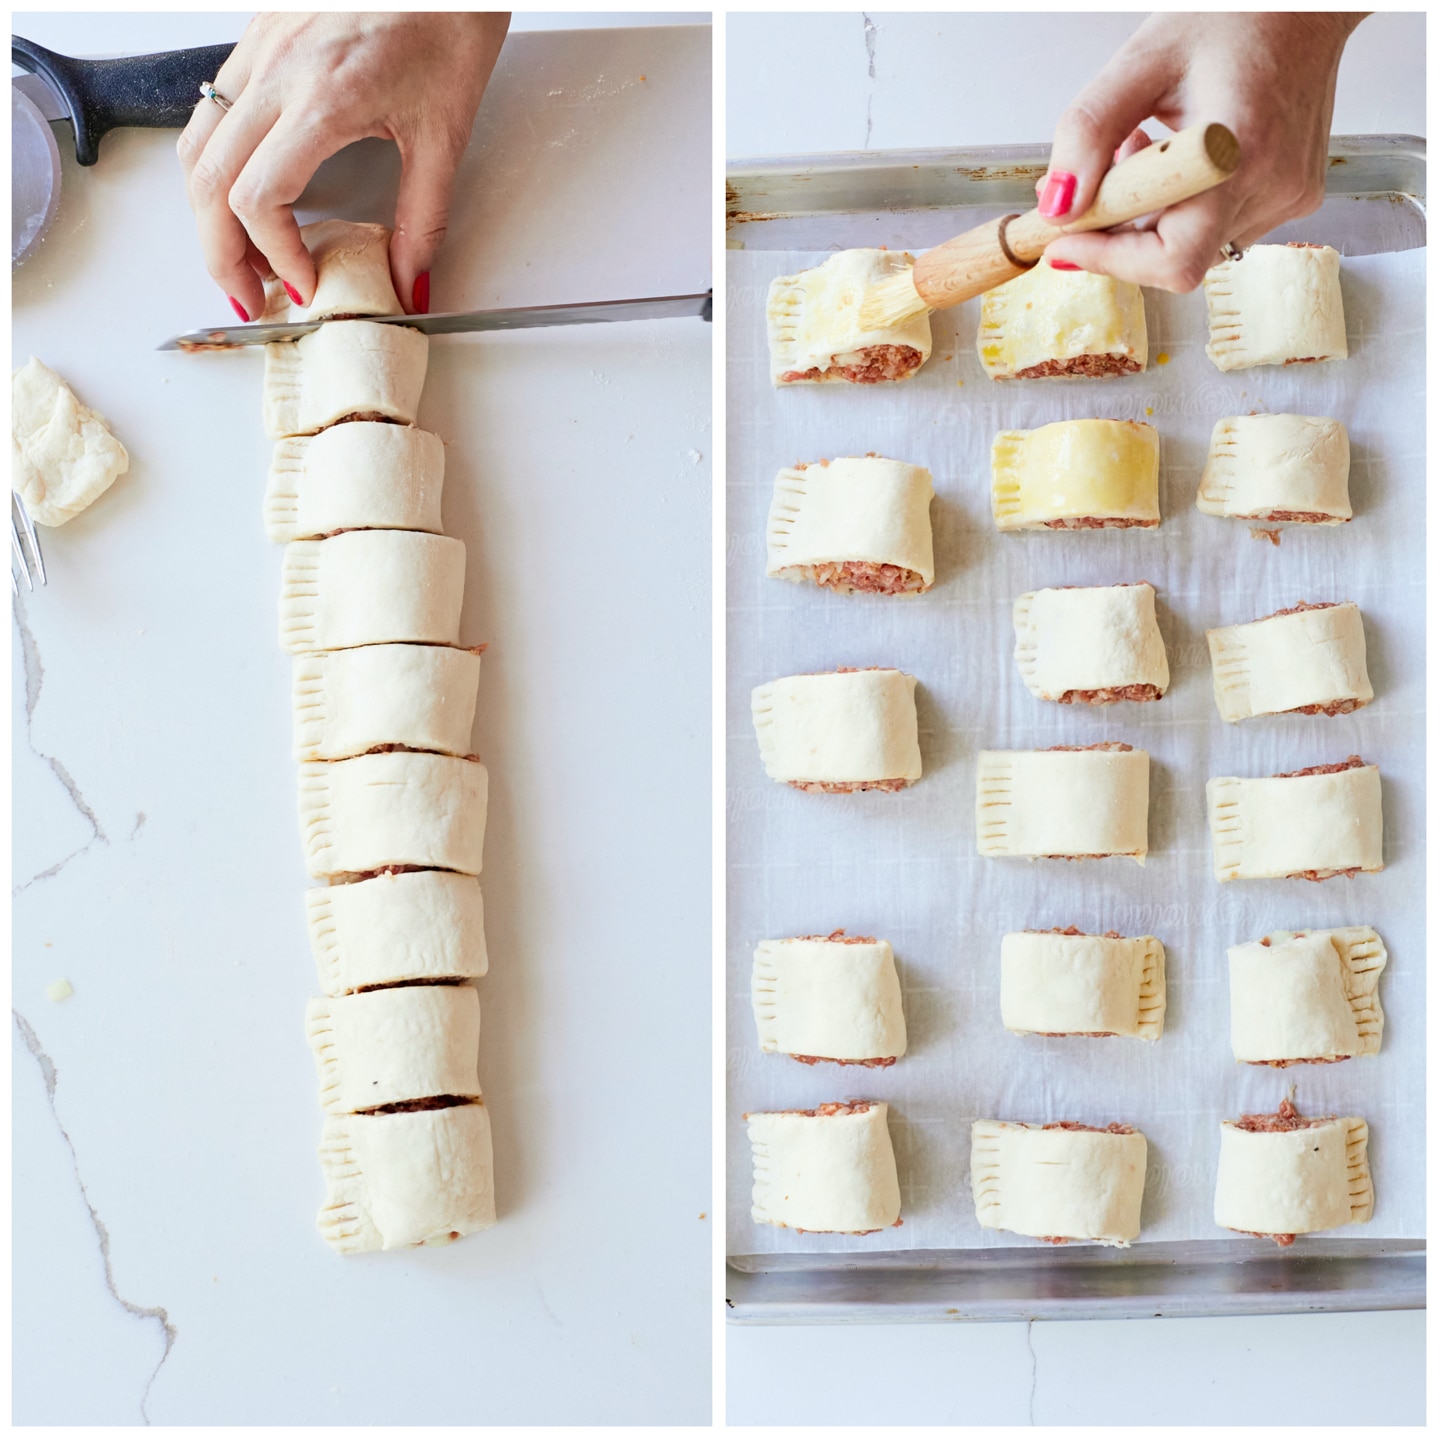
  2. Cut each log into equal pieces, about 1½-inches (4 cm) long at the seam side and place on your prepared baking sheet. You will yield around 20 sausage rolls.
Homemade Irish Sausage Rolls slicing brushing egg wash

Bake the sausage rolls

  1. Brush with the egg wash and bake for 35-40 minutes, until puffed and golden brown.


FAQs

Why are the bottoms of my Sausage Rolls Soggy?

The soggy bottom of your Sausage Rolls may be because your pastry absorbed the extra moisture from your sausage filling, or your pastry softened from handling, causing the gluten structure to collapse before fully forming.

To prevent soggy Sausage Rolls, keep in mind:

  1. Try squeezing out as much moisture from your onions as possible to keep them from affecting your pastry.
  2. Or refrigerate your pastry for a bit to keep its shape when baking.
  3. You can also blind-bake the pastry to create a solid base for your sausage filling.
  4. Another method to prevent a soggy bottom is to place your rolls on a cooling rack to let the steam come out from the bottom.

Why are my Sausage Rolls splitting open?

Your Sausage Rolls may split open while baking because the meat filling will shrink and release fat.

  1. Try your best to wrap the pastry as tightly as possible over the filling.
  2. Press your fork to seal the edges.
  3. Brush a good amount of egg wash.

How do I keep my Sausage Rolls from going dry?

To ensure a moist Sausage Roll, make sure to incorporate fresh breadcrumbs and non-lean pork into your sausage filling.

  1. Breadcrumbs add a great amount of moisture to your rolls, as they absorb the fats of your meat and will keep the bottom from going soggy.
  2. Using non-lean pork will increase the fat and moisture in your roll; however, make sure not to work the sausage filling too much otherwise it can make it tough and dry.

How do I know if my Sausage Rolls are cooked through?

The best way to know if your Sausage Rolls are cooked through is to check the pastry.

  1. If it becomes golden brown and crispy, it’s likely your rolls are properly cooked through.
  2. If you want to double-check, feel free to take one out of the oven, cut it open, and use a meat thermometer or check the color of the meat. An internal temperature of 165°F or higher is safe for consumption.
  3. But you can also look out for a mostly brown interior. If it’s slightly pink, that’s okay.

Ingredients

  • 1 pound (16 oz/450 g) ground sausage meat*
  • 1 large egg
  • 1 small onion , finely diced
  • ¾ cup (1¼ oz/35 g) fresh breadcrumbs 
  • ½ teaspoon salt
  • ½ teaspoon pepper
  • 1 recipe Puff Pastry 
  • Egg wash

Instructions

  • Preheat the oven to 375°F (190°C) and line a baking sheet with parchment paper.
  • In a medium bowl, mix together the sausage, egg, onion, breadcrums, salt and pepper. Set aside.
  • On a lightly-floured surface, roll out the puff pastry into roughly a 12 x 14-inch (30 x 35 cm) rectangle.
  • Cut the pastry sheet in half lengthwise so that you have two 6 x 14-inch (15 x 35 cm) strips of dough.
  • Divide the sausage filling mixture in half. For each piece of dough, form half of the filling into a log that runs the length of the rectangles. Brush the edges of the pastry with egg wash.
  • Wrap the dough over the filling and shape into a log. Trim the pastry a little to tidy up the edge and press with a fork to seal. With the fork piece so holes in the top of the pastry.
  • Cut each log into pieces, about 1½-inches (4 cm) long at the seam side and place on your prepared baking sheet. You will yield around 20 sausage rolls.
  • Brush with the egg wash and bake for 35-40 minutes, until puffed and golden brown.
  • Let cool for 15 minutes before serving. Store leftovers in a covered container in the refrigerator for up to 3 days.

Puff Pastry


Ingredients
14 tablespoons (7 oz/198 g) butter ,frozen
4 – 5 fl oz (120 -148 ml) ice water
1 tablespoon (½ fl oz/15 ml) lemon juice
2 ⅓ cups (11 ½ oz/ 325 g) all purpose flour
⅙ teaspoon salt

Instructions

  • Place your butter in the freezer for a minimum of 2 hours, or preferably overnight.
  • In a jug, mix together the water and lemon juice and set aside.
  • In a large bowl, mix together the flour and salt.
  • On the larger side of a grater, grate the frozen butter directly into the flour mix. Stir the butter into the flour to coat it.
  • Add in the water and lemon juice mixture, holding a little back just in case you don’t need it all. Bring your pastry together gently to form a ball. You want to add just enough water to bring the pastry together. Too much water will not yield you a flakey dough.
  • Wrap the dough in cling film and place it in the fridge for a minimum of 1 hour. You can refrigerate it for up to 3 days or freeze it to use at a later day. (Note: Once you put the pastry in the fridge and it relaxes, it will get a little wetter, so factor that in)
  • To use your pastry: Follow the instructions required by the recipe you are making. Always bake in a HOT oven for the best results.